Handling Errors in React Components with Error Boundaries
|

A React App is usually one big component made up of smaller components. This makes for easy organization of code. A problem arises though when any of these smaller components has an error. What happens? The whole app crashes. Sad Story huh? Well, it doesn't have to be that way.
You can learn more about React in this article.
Along with React 16 came a feature that is a really good friend - Error Boundaries. Here's what the official document says about it.
Error boundaries are React components that catch JavaScript errors anywhere in their child component tree, log those errors, and display a fallback UI instead of the component tree that crashed. Error boundaries catch errors during rendering, in lifecycle methods, and in constructors of the whole tree below them.
So let's understand that in parts. Error Boundaries are React Components and they catch error anywhere in their child component tree. This means that they do not catch errors that occur within themselves and need to have children components to make any sense. The errors are logged, hence it is possible to get info about the error and exactly where this error occurred. The fun part is that you can display a fallback UI, so you can choose to display whatever you want instead of the component that crashed.
A component becomes an error boundary if it defines the componentDidCatch(error, info) method. This lifecycle method was introduced in React 16 too.
If you this doesn't really make sense to you yet, I think a practical example will help. So let us create an error boundary component class.
How to create an Error Boundary
import React, {Component} from 'react';
import ReactDOM from 'react-dom';

class ErrorBoundary extends React.Component {
    constructor(props) {
    super(props);
    this.state = {hasError: false };
}

componentDidCatch(error, info) {
    this.setState({hasError: true });
}

render() {
    if (this.state.hasError) {
        return <h1>Oops!!! Something went wrong</h1>;
    } else {
        return this.props.children;
        }
    }
}
From the code above, notice that an error boundary is defined like a regular React component with the difference being the componentDidCatch method. So what's going on in the component? hasError is set to an initial state of false. If ever there is an error during rendering, in lifecycle methods, and in constructors in any of its children components or any subcomponent below it, the state of hasErroris changed to true. This state determines what will be rendered as seen in the render function. If there's an error, an error message is rendered instead.
Let's put this error boundary to use.
Using An Error Boundary
We are going to use part of a to-do app to explain this. Here's the full app on CodePen.
class ToDoApp extends React.Component {
    ...

    render() {
        return (
            <div>
            <h2>ToDo</h2>
            <div>
                <Input />

                //Error Boundary used here
                <ErrorBoundary>
                <ToDoList />
                </ErrorBoundary>

            </div>
            </div>
        );
    }
}
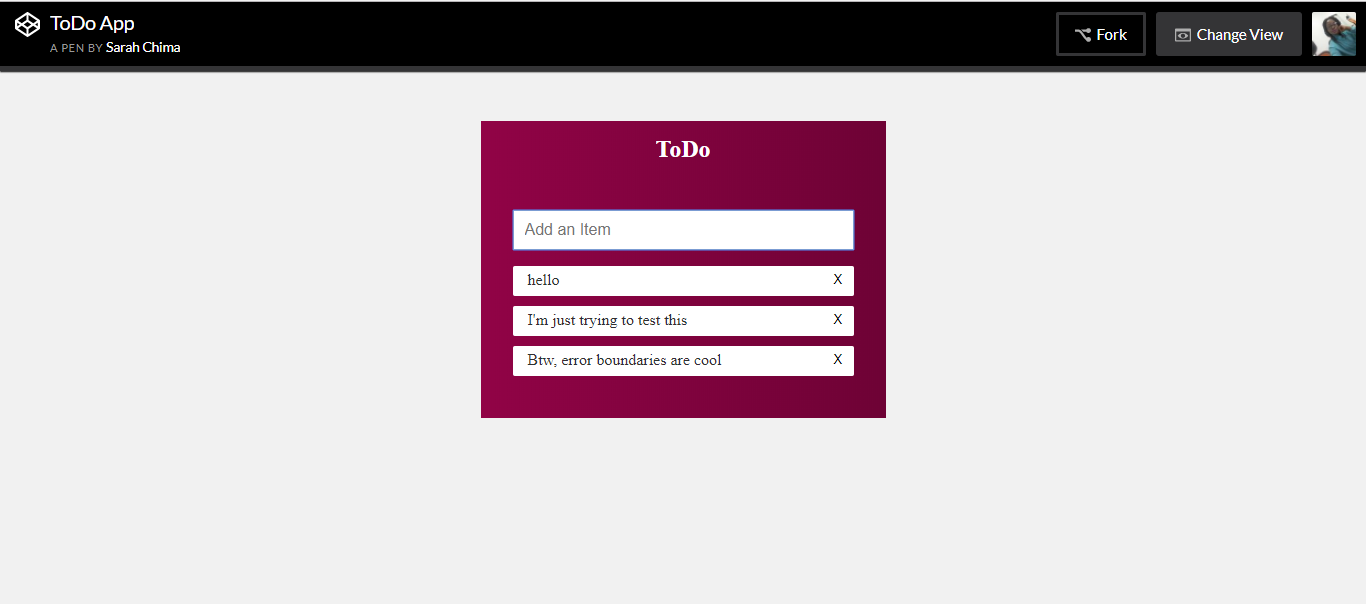
In the code above, you can see that the error boundary is used like a normal component and is wrapped around the TodoList component. If there's ever an error in this component or its children components, the error boundary component displays a fallback UI. Below is an image of the to-do app with no error.

Here's what happens when there is an error in the <ToDoList /> component.

Note that the place where you place the error boundary in your code determines where the fallback UI will appear. Let us place the error boundary opening tag before the <Input /> component.
    class ToDoApp extends React.Component {
        ...

        render() {
            return (
            <div>
                <h2>ToDo</h2>
                <div>

                //Error Boundary used here
                <ErrorBoundary>
                    <Input />
                    <ToDoList />
                </ErrorBoundary>

                </div>
            </div>
            );
        }
    }
If there's an error, here's the display you get. Notice that unlike the previous image, the input does not appear. Kindly ignore the uneven spacing. :)

Ideally, an error boundary component is declared once and then used throughout an application.
More On componentDidCatch()
Now, let's get back to the componentDidCatch method. It works like the Javascript catch{} block, but for components. You'll notice that componentDidCatch has two parameters, error and info. What are they?
The first parameter is the actual error thrown. The second parameter is an object with a componentStack property containing the component stack trace information. This is the path through your component tree from your application root all the way to the offending component. Let's modify our error boundary to make use of this parameters.
import React, {Component} from 'react';
import ReactDOM from 'react-dom';

class ErrorBoundary extends React.Component {
    constructor(props) {
        super(props);
        this.state = this.state = {
            hasError : false,
            error    : null,
            info     : null
        };
    }

    componentDidCatch(error, info) {
        componentDidCatch(error, info) {
            this.setState({
                hasError : true,
                error    : error,
                info     : info
            });
        }
    }

    render() {
        if (this.state.hasError) {
            return (
                <div>
                    <h1>Oops!!! Something went wrong</h1>
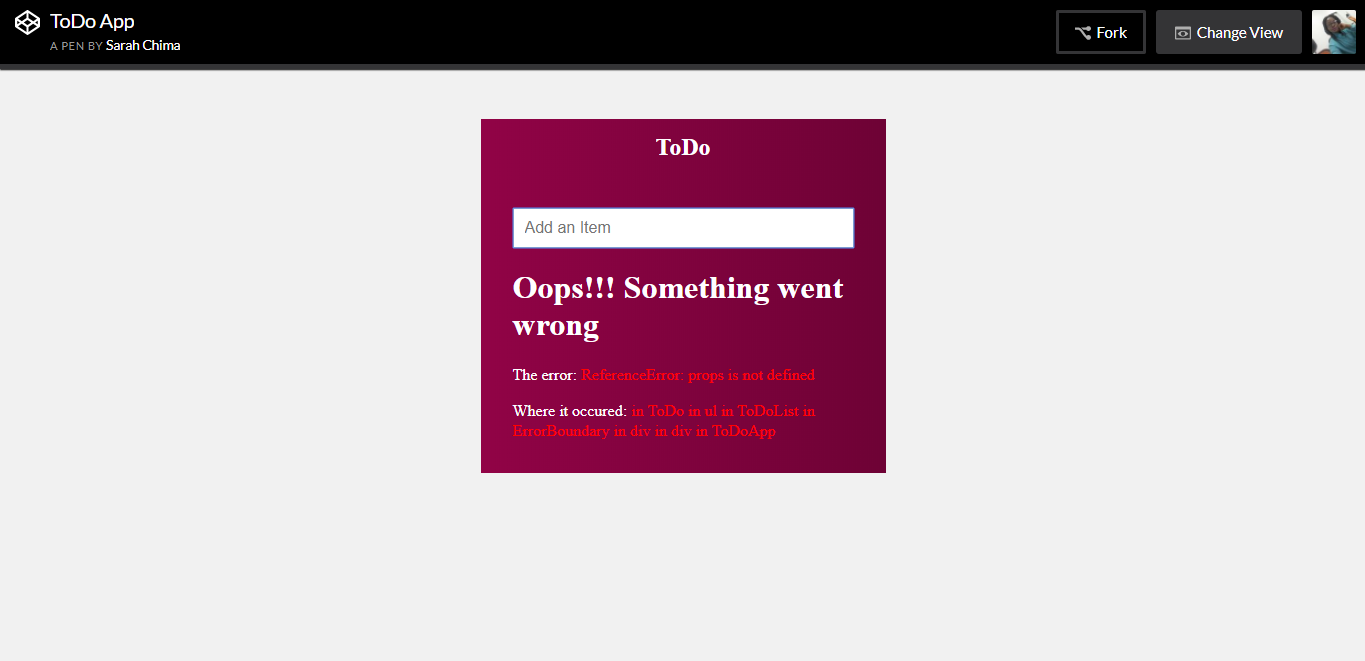
                    <p>The error: {this.state.error.toString()}</p>
                    <p>Where it occured: {this.state.info.componentStack}</p>
                </div>
                );
            } else {
            return this.props.children;
            }
        }
    }
What we did is modify our state to capture the error and info. Then display this error message and info in the fallback UI. When there's an error, here's what we get.

You can also log the error gotten to an error reporting service.
import React, {Component} from 'react';
import ReactDOM from 'react-dom';

class ErrorBoundary extends React.Component {
    ...
    componentDidCatch(error, info) {
        this.setState({hasError: true });
        logErrorToService(error, info);
    }
...
}
Conclusion
Now that you have understood what an error boundary is and how it can be used, I bet you think it's super cool. However, do not let the excitement make you want to wrap each component in an error boundary. This tweet says it all.
Error boundary work many levels deep, so there’s no need to “wrap at every level”. Just put your <ErrorBoundary> in a few strategic places.
— Dan Abramov (@dan_abramov) July 27, 2017
Got any question or addition? Leave a comment.
Thank you for reading. :)